Make a Transparent Signature

Anyone can create a transparent signature for “signing” PDF documents. No special software is required. In this article, we will walk you through how to create the signature, then how to use your transparent signature to sign PDF documents.
Key Takeaways:
- Use your phone or a camera to get an image of the signature
- How to prepare the signature image
- How to make the signature transparent
- Use the transparent signature as a PDF stamp
- Create a digital signature for PDF document signing
- Other ways to use a transparent signature
READ ALSO:
10 Best Document Management Software for Small Businesses in 2024
10 Best Document Scanning Software for Windows 10 Users in 2024

Step 1: Get an Image of Your Signature
So the first step is to get your signature on your computer. You can do this with a scanner or with your phone.
Option 1: Scan Your Signature
- Sign on a clean sheet of paper using the biggest signature you’d ever expect to need (it’s easy to shrink a signature, harder to enlarge one cleanly)
- We suggest using FileCenter to scan it. Go to FileCenter’s PDF Editor or Image Editor tab, click Scan, and scan the page. (For a free, fully-functional trial of FileCenter, click here)
- Zoom the display to 100-150%
Option 2: Take a Picture of Your Signature
- Sign on a clean sheet of paper using the biggest signature you’d ever expect to need (it’s easy to shrink a signature, harder to enlarge one cleanly)
- Take a picture of the signature with your cell phone. Try to avoid uneven light or shadows. You want the background to be an even white
- Transfer the photo to your computer
- Open the photo. Zoom in until the signature on your screen is about the same size as the signature on the paper, or a little bit bigger
Step 2: Prepare the Image
Next we’re going to trim your signature and turn it into an image that supports transparency. With the image displayed on your computer monitor:
- Go to the Windows Start button and type Snipping Tool in the Search box, then open the Snipping Tool
- Draw a rectangle closely around your signature
- Save it as a PNG file
Step 3: Remove the Background
Now we need to remove the white background. If you have a favorite graphics program, you probably already know how to do this. If you don’t, follow these steps:
- Go to https://pixlr.com
- Click the Pixlr E or Advanced Photo Editor option
- Click Open Image
- Browse to your signature and open it
- On the left you’ll see tools; select the Wand Select
- On the toolbar above the image, set Tolerance to about 20
- To the right of that setting, de-select Contiguous
- Click anywhere in the white
At this point, the selection should be tight around your signature. If it isn’t, or if it chops off parts of the signature, type Ctrl D to remove the selection, adjust the Tolerance up or down, and try the selection again. Raise the tolerance if there is a lot of “noise” or extra dots; lower the tolerance if it is eating into your signature. Once the selection looks good:
- Go to the Edit menu > Clear (or hit the Del button on your keyboard)
- Go to the Select menu > Deselect (or type Ctrl+D)
- Go to the Page menu > Trim
Your image now has a transparent background. NOTE: It looks like a checkerboard, but that just tells you that there is no background.
Finally, go to File > Save. Be sure to select PNG as the format and make sure that Transparent is turned on. Click Save As.
Now give it a name and click Apply. It will save the image to your Downloads folder.
Congratulations! You now have a transparent signature. Read on to learn what you can do with it …
Aside: Consider FileCenter
For the instructions below, we’re using FileCenter as the PDF editor. Why? Because it’s easy. FileCenter makes organizing your files and working with PDFs a piece of cake. It includes a PDF editor that is on par with Adobe Acrobat Professional, but without the steep monthly price. FileCenter has a fully-functional trial version if you’d like to give it a go. No obligation.
If you already have Adobe Acrobat or another PDF editor, the instructions will be very similar.
Use Your Transparent Signature as a PDF Stamp
Now you have a transparent signature that you can use anywhere. The easiest way to use it is as a stamp in FileCenter. Go to FileCenter’s PDF Editor tab, then do this:
- Go to the File menu in the PDF editor > New Document > With Blank Pages and click OK
- Click the drop-arrow next to the Stamps button (it’s near the far right side of the PDF editor’s toolbar)
- Click the Stamps Palette button below the stamps
- The Stamps Palette will open in its own window
- On the stamps palette, click the Add New button, then Add New Image from File
- Next to Image, click the folder button and browse out to the signature you just made and open it (tip: if you can’t see your file, make sure File Type is set to PNG)
- Under New Stamp Options at the bottom, click Add New next to Target Collection
- Type “Signatures” then click OK
- Click OK to add the stamp
Your signature will now appear as a stamp in the palette. You can close the palette now.
You’re done creating your signature stamp. It’s ready to use. So let’s sign something:
- Click the drop-arrow next to the Stamps button
- Scroll down until you see your signature
- Select it
- Stamp it on the PDF
- Use the corner handles to resize it to fit the signature line
- Use the circle in the center to reposition the signature
Create a Digital Signature with an Actual Signature
The signature stamp from the last step is convenient, but in some cases, it won’t qualify as a real “digital signature.”
A “digital signature” is more than just a picture of your signature. “Digital signature” is an official, technical term. When you “digitally sign” a PDF, you place an encrypted stamp on the document that “locks” it, preventing any further changes to the PDF. In other words, a digital signature is a mark that proves you signed the document at a specific date and time, and that the document has not changed since.
Digital signatures don’t need to include an actual signature, though most will include your name with a fancy font that mimics an actual signature. But what if you could use your real signature in a digital signature? Well now you can. Here’s how to do it.
First, import your transparent signature:
- Go to FileCenter’s PDF Editor tab
- Go to the File menu in the PDF editor > New Document > With Blank Pages and click OK
- Go to the Document menu in the PDF editor > Digital Signatures > Place Signature
Your mouse cursor will turn to a rectangle; this is for placing your signature. For now, click anywhere on the page. The Sign Document dialog will open:
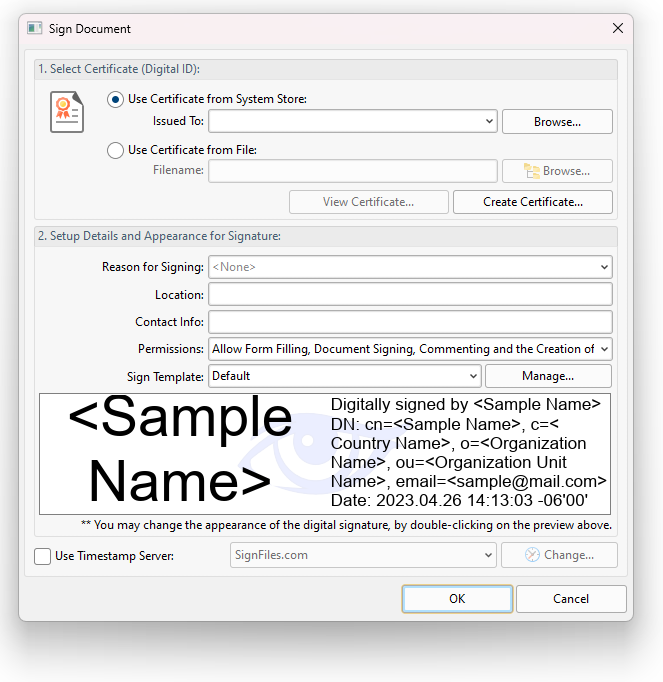
You will notice it asks for a digital certificate. If you don’t know what that is, just click Create Certificate and follow the prompts. If you already have a certificate, open it, or click the drop-arrow by Issued To to select it. You only need to do this once.
Section 2 has details you can fill out when you sign a document. In particular, look at the Permissions option. Here you can lock down your PDF as tightly as you’d like.
What we care about, though is the section with <Sample Name>. This is the actual stamp that will go on your document. This is your digital signature, and it’s the part we want to customize:
- Double-click on the image that has <Sample Name>
- A list of digital signature templates will open
- Select the first one (Default) and click the Edit button
- For the Icon, click Change > Import from File
- For the source image, click the Browse button (it looks like a folder)
- For File Type, make sure that PNG is selected
- Browse to your transparent signature and open it
- After it opens, make sure Remove Background is selected
- Click OK
Now you can see your signature in the stamp. The Display Text section lets you choose what other elements you want to have in the stamp, like date, location, reason, your typed name, etc. Customize it however you’d like, then click OK. Click OK again to close the list of templates.
Now you’re ready to sign your document. Fill out the information on the Sign Document dialog, then click OK. Your signature will be placed on the document.
Here’s how to digitally sign a PDF in the future:
- Go to the Document menu in the PDF editor
- Select Digital Signatures > Place Signature
- Place the rectangle exactly where you want the signature to go, then click
- Fill out the required info
- Click OK
You will usually be prompted to save a new copy of the PDF. The new copy is signed and secured.
Other Ways to Use a Transparent Signature
Your transparent signature works great in PDF files, but you can use it in other ways too.
We created your signature as a PNG file. This is a basic image file that works just about anywhere. For example, to place it in a Word document:

- Click the Insert tab
- Select Pictures > From This Device
- Browse to your signature file and open it
- Use the corner handles to resize the signature
- To place the signature exactly where you want it, click the Position icon next to the image and change it to In Front of Text then drag the image anywhere you’d like
You can use your signature in PowerPoint slides, spreadsheets, on web pages … any program that lets you insert an image.
